If your products are priced based on user-input measurements like “width” and “height,” you’ll discover that WooCommerce alone isn’t quite up to the task. You’ll require an extra plugin capable of integrating input fields into your products, enabling pricing calculation through formulas or lookup tables.
This guide will walk you through the process!
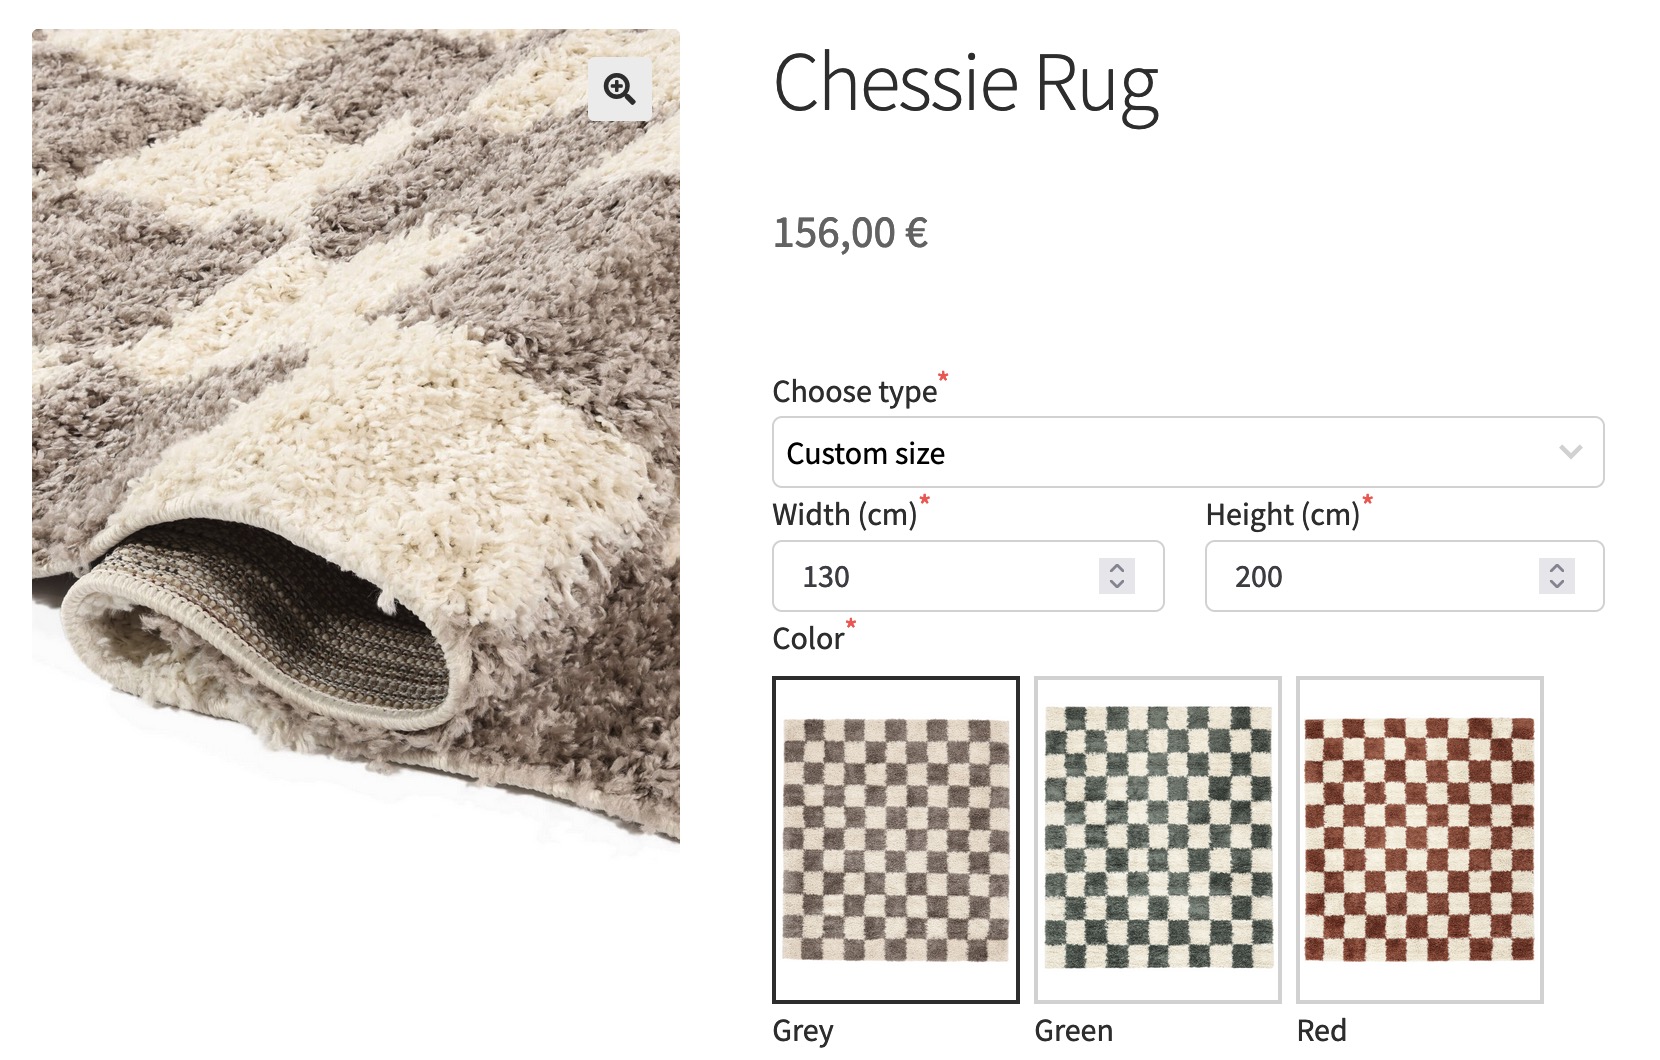
We’ll develop a carpet configurator within WooCommerce, allowing users to customize the size of the product according to their needs. It will be possible to order a carpet of a preferred size by entering “width” and “height” values. Yet it will possible to choose among predefined sizes of the product for faster checkout.
Additionally, we’ll incorporate a custom pricing system based on measurements (utilizing the mentioned above “width” and “height” values) on top of the product’s base price. Flexible pricing based on maths formulas is one of the features of Uni CPO plugin!
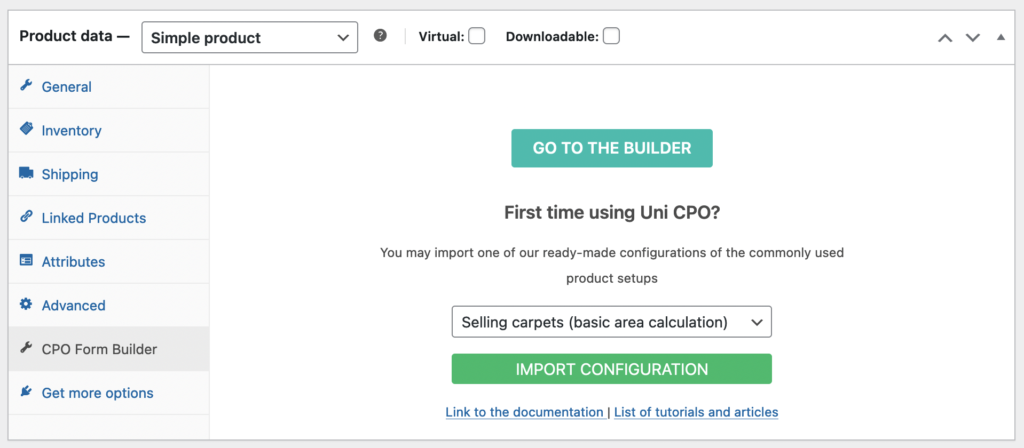
Before delving into the process, it’s crucial to grasp how your pricing will be structured. WooCommerce mandates setting a base price for products; otherwise, it may interpret the product as free. Thus, when setting up your carpet configurator, establish a base price representing the minimum cost of your window. On the products archive page the price label for this product will be shown as “from XX”. For this example I have set the product price equal to €60. Important: product type must be set to “simple”! After setting the price and the correct type of the product we must save it as draft or publish.
Customers will be using “width” and “height” options and these values will take part in the final price calculation. Alternatively, customer will be using “dimension” option to choose among predefined sizes and the price will be set based on the chosen option.
While a window configurator typically offers various options, this tutorial primarily focuses on measurement-based pricing. Therefore, we’ll demonstrate how to incorporate “width” and “height” fields. These fields enable users to input custom sizes, consequently adjusting the total product price accordingly. It’s worth noting that this is merely an illustrative example, because your product may utilize different/additional options and/or pricing strategy. Yet it is a solid example of a product configuration that will inspire you to create a new one and best suitable for your type of product.
We should drag and drop modules and options into the builder content area. This the UI of the pro version of the plugin and it shows more icons compared to the free version, which means we can use more features.
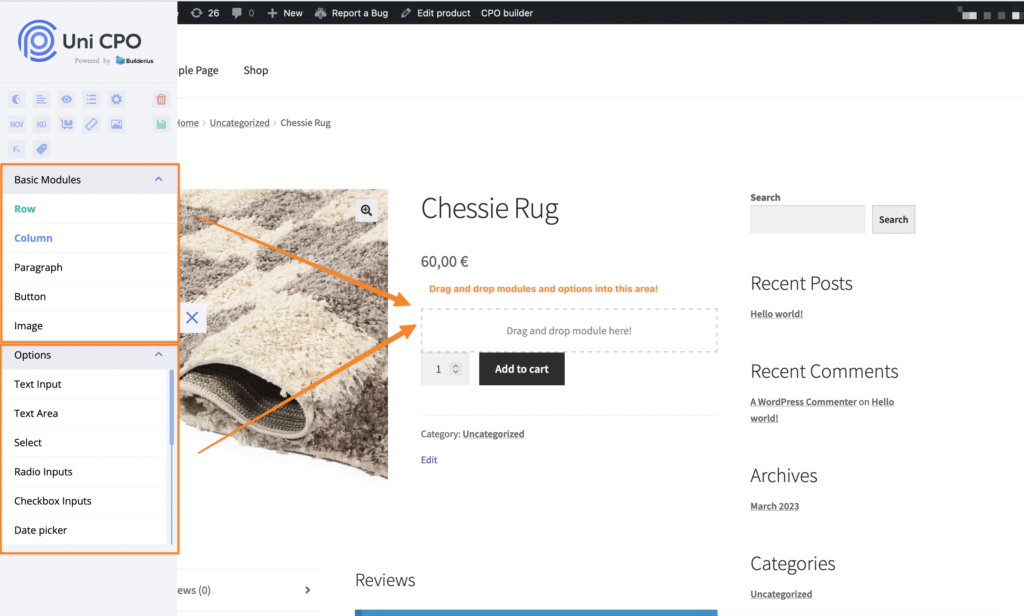
Using the visual builder is quite easy and straightforward. First thing we add a Row. It already contains one Column. Modules can be added into the Column then. First option we add is Select and we will offer the customers a choice to choose either among the pre defined sizes or define custom “width” and “height”.
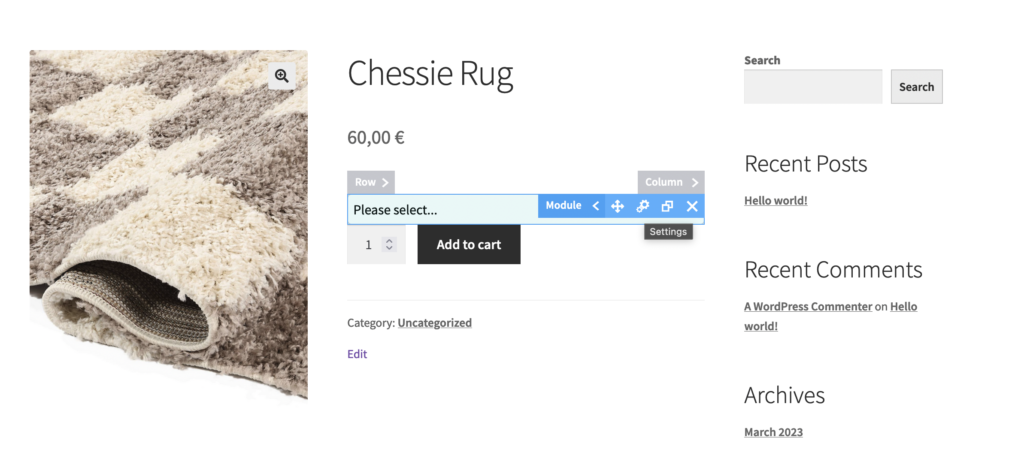
Now we open module settings by clicking on “cogs” icon shown in the blue module overlay UI. We open then “Main” tab of the module settings modal window:
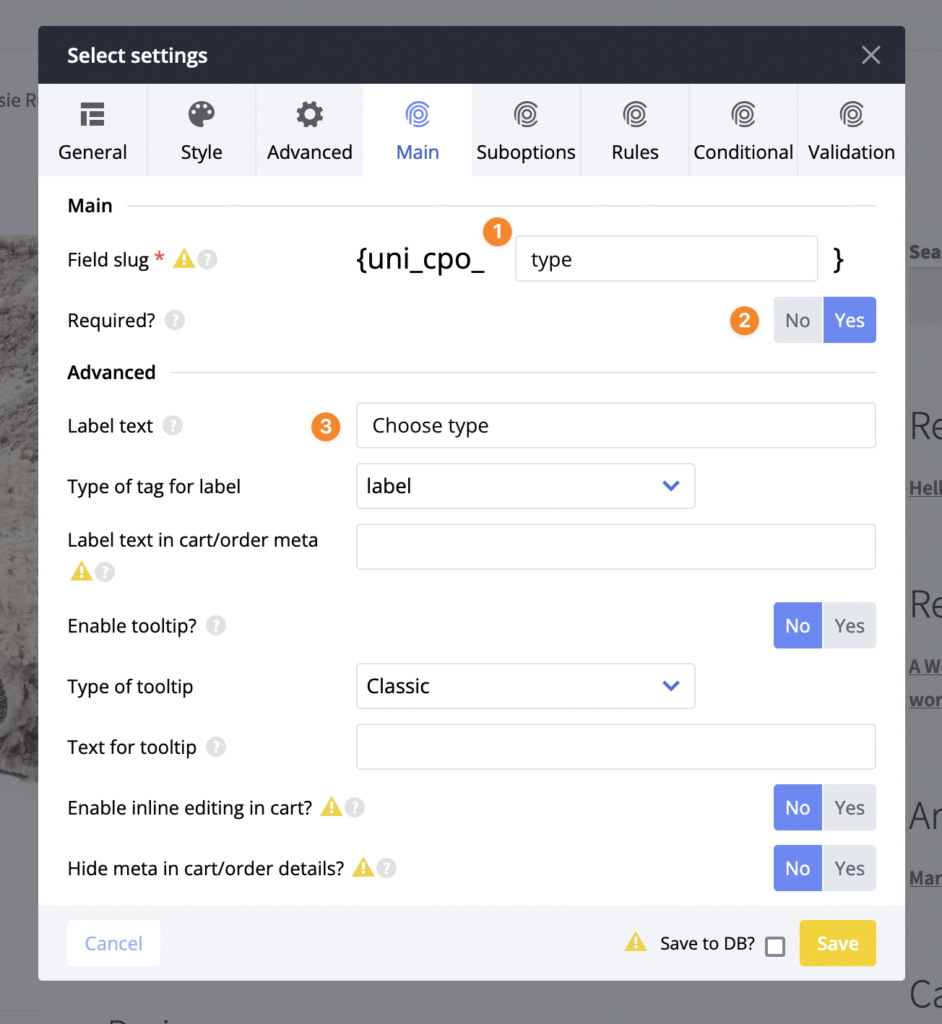
There are three important settings: field slug (1), required? (2) and label (3). Field slug value is a unique option name used across the site. For this example we write down word “type” and the whole field slug becomes “{uni_cpo_type}”. This name is also a variable that can and should be used in the price calculation formula. Next we set option’s label – the description name of the option visible on the page.
Next, we open “Suboptions” tab in order to add two choices: “predefined size” and “custom size”:
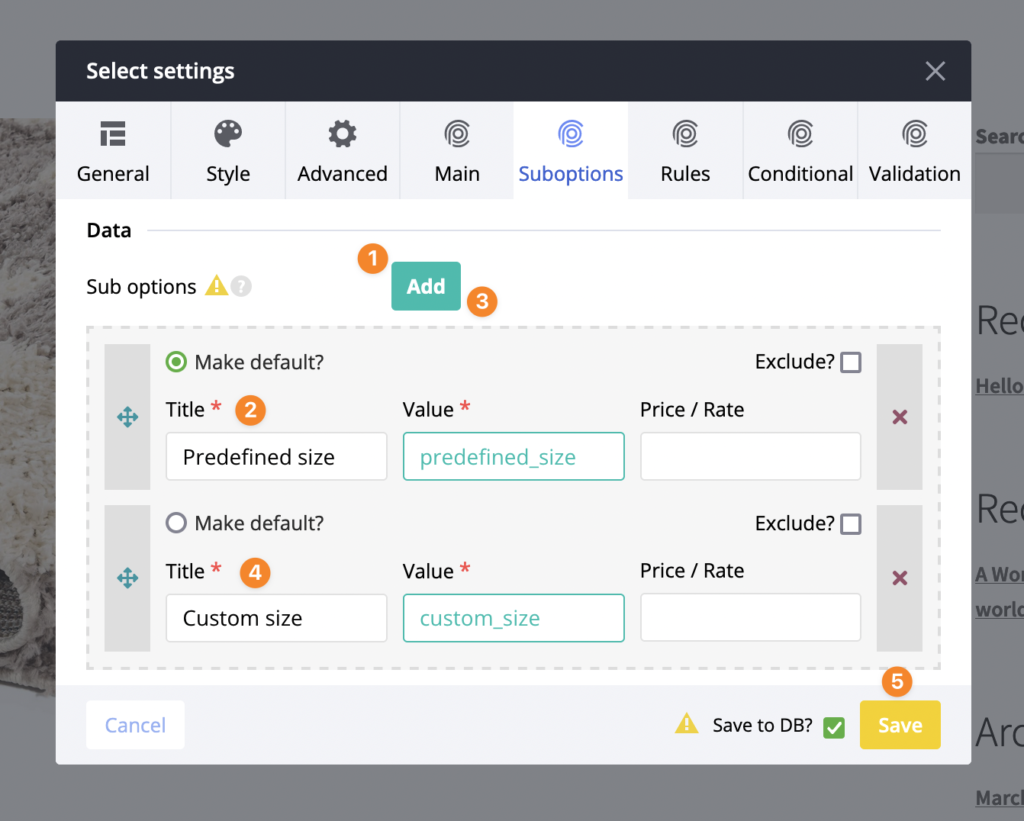
This is what we did here:
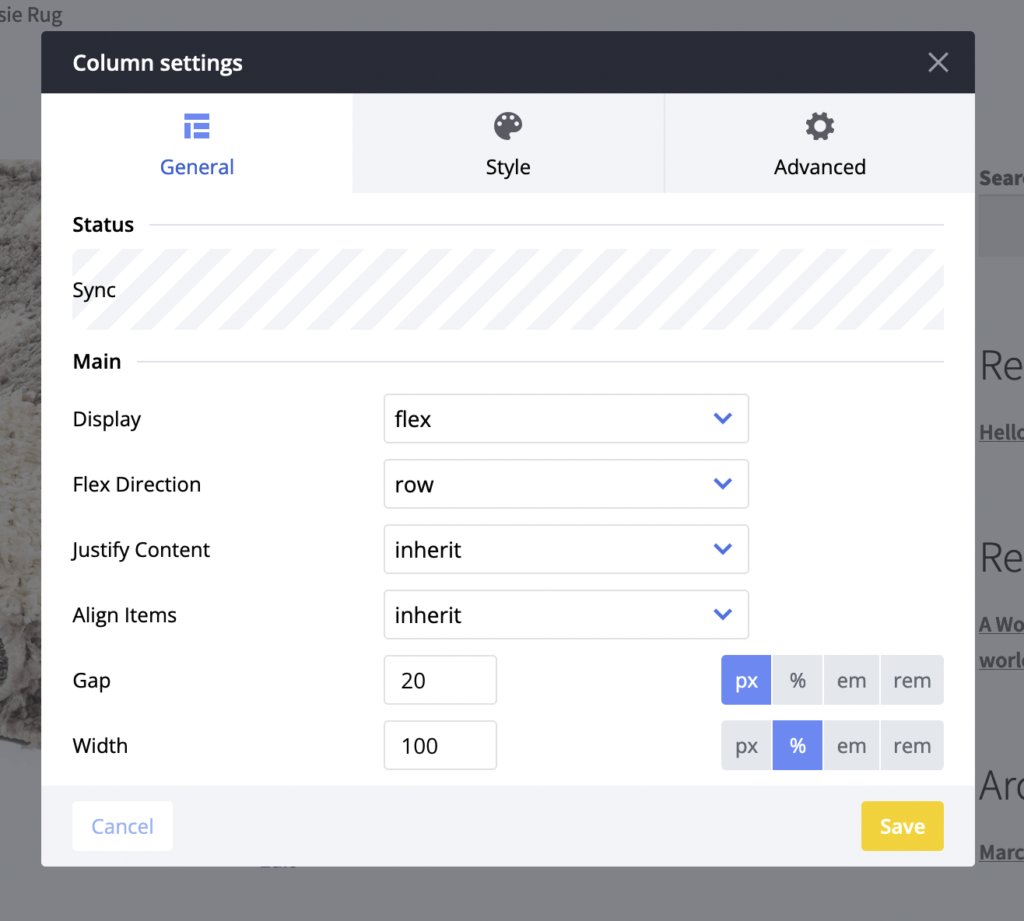
Then, we add a new Column below the first one into the same Row. We set styling settings – display: flex and gap: 20 px. We want to add two input fields next to each other with a space of 20px between them. Now click “Save”.
Next, we add an option Text Input
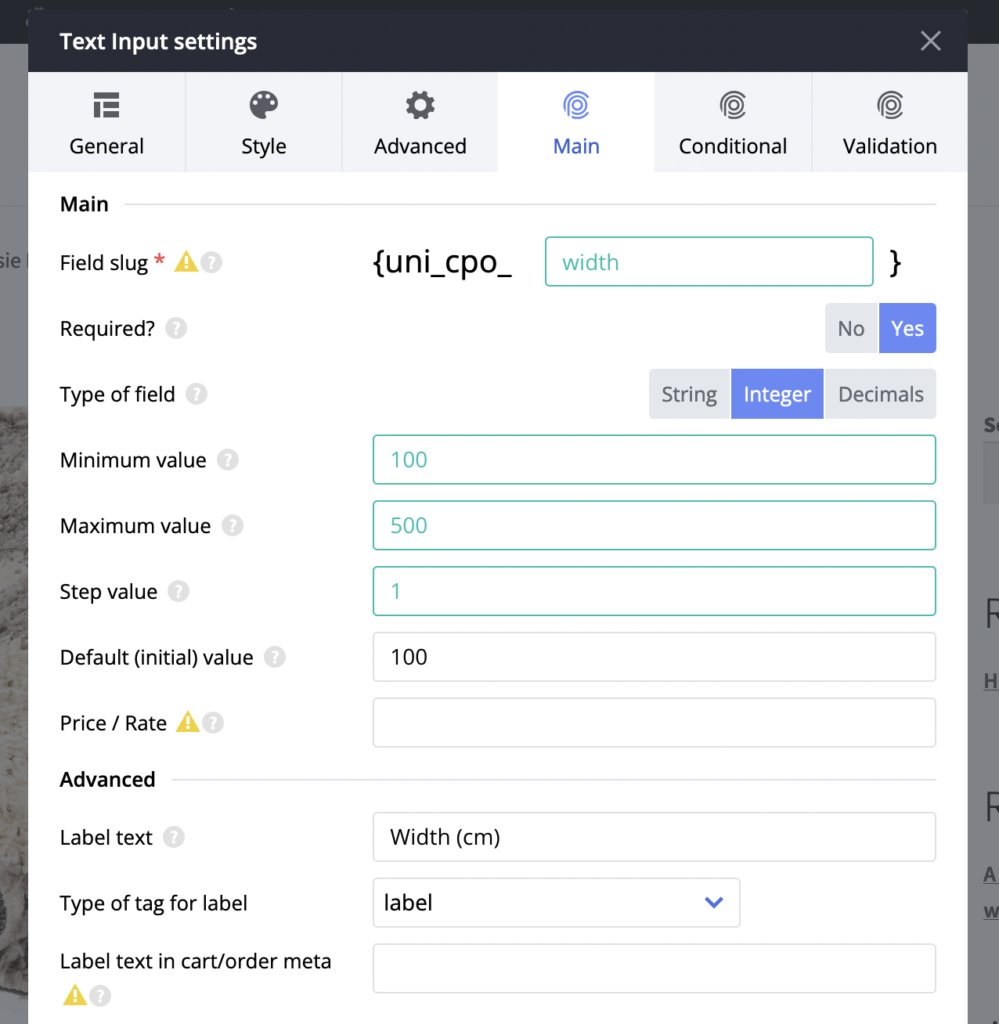
These are the settings for “width” option: min value, max value, step and lable. Also, the option slug name: “width”. Now we have a new variable “{uni_cpo_width}” and we will use it later in our price formula. Next step – we are going to setup fields conditional logic for this field. So, click on tab “Validation” and proceed with these settings:
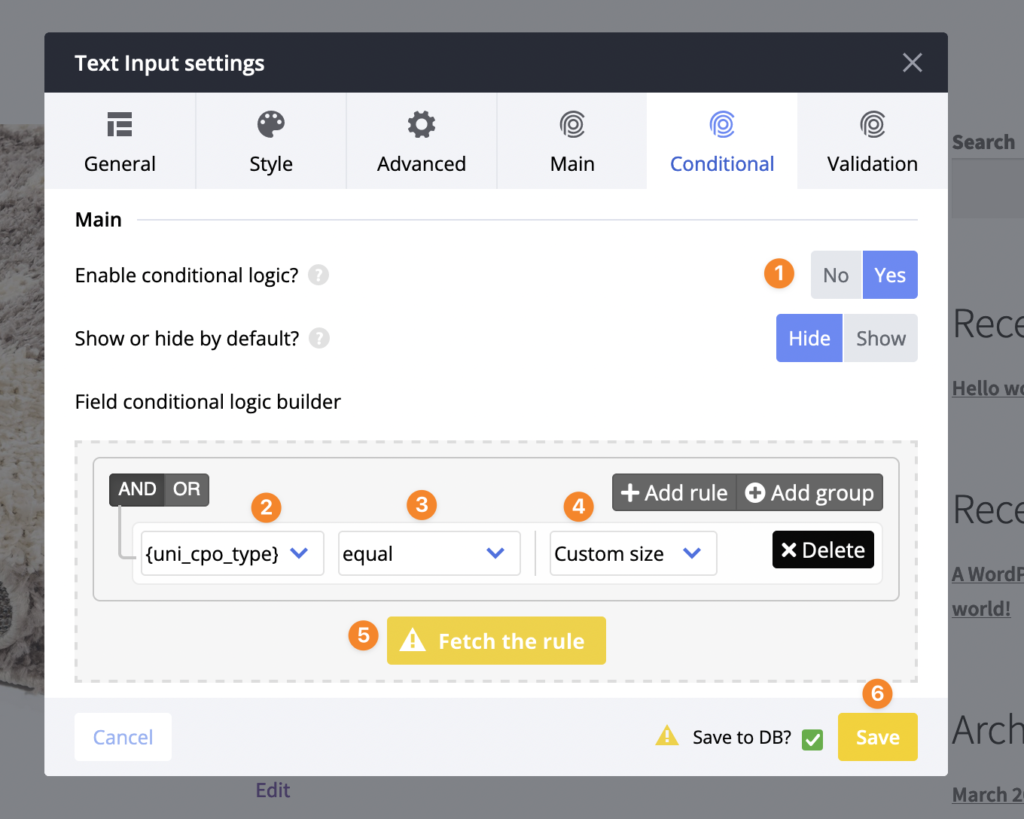
Here we have:
Next, let’s add “height” option. We are going to duplicate “width” to make things faster:
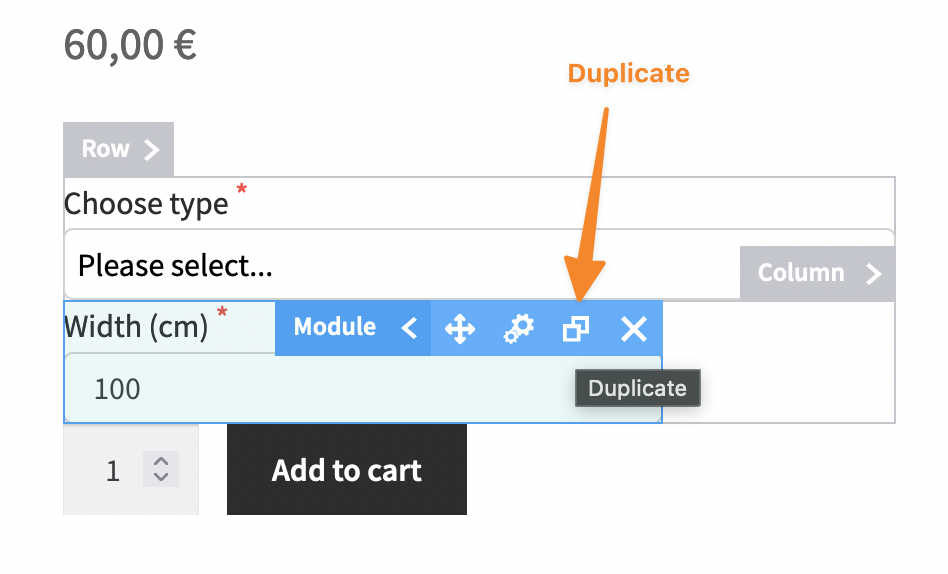
After the option is duplicated open its settings, change the slug to “height”, change the label to “Height (cm)” and setup the fields conditional logic. Click “Save” then.
Next step – let’s add “size” option type Select to offer pre defined sizes of the product. First we add Column between already existing two. Add Select option in the newly added column, set option’s slug to be “size” (now we have “{uni_cpo_size}” variable!) and label to be “Size”. Add these suboptions:
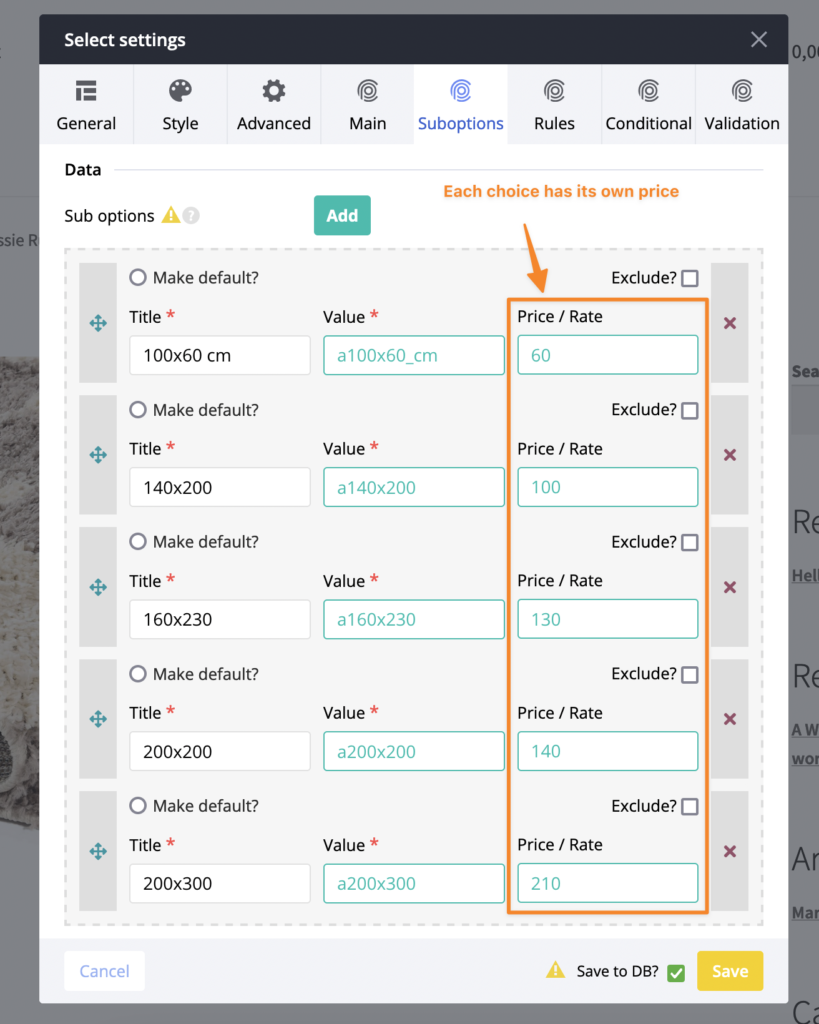
This time we are using “price/rate” settings for each suboption. This way we define prices for each choice. Practically, it means that when one of these suboptions is selected – variable “{uni_cpo_size}” will have value equal to the defines “price/rate”. It is important step since a bit later we will use this variable in our price calculation formula! That’s not all. For sure we want to add fields conditional logic. It can be done in the similar way like we did for “width” and “height”, but we want to Click “Save” now.
Finally, we are going to add Radio option to offer customers different colors of the product. This option will also have its own variable (all options do have its own connected to them variables! 🙂 ). But this option will not modify the price, so will not be setting “price/rate” values for each suboption.
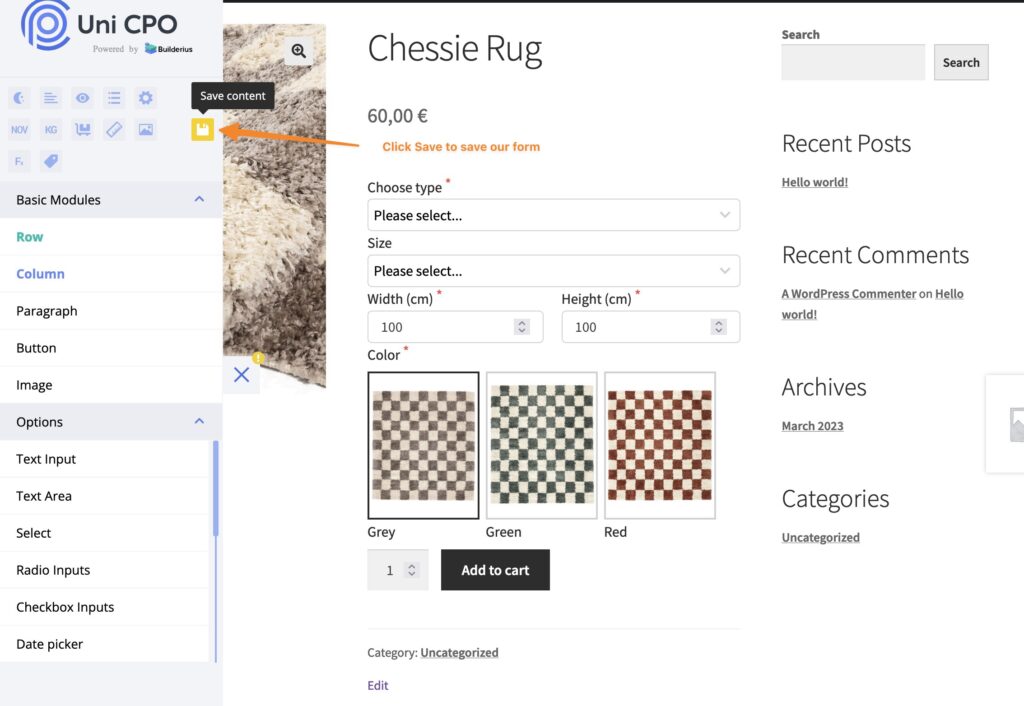
Let’s review what we have got so far:
If you are feeling like difficulties managing custom options – feel free to check our tutorials and resources about Uni CPO.
At the end of STEP 1 we have all custom product options added and ready to be used in product price calculation. We also display product options “Size” and “Width”/”Height” conditionally.
Open General settings by clicking on the “cog” icon on the panel. We have to enable displaying of the custom options and enable custom pricing:
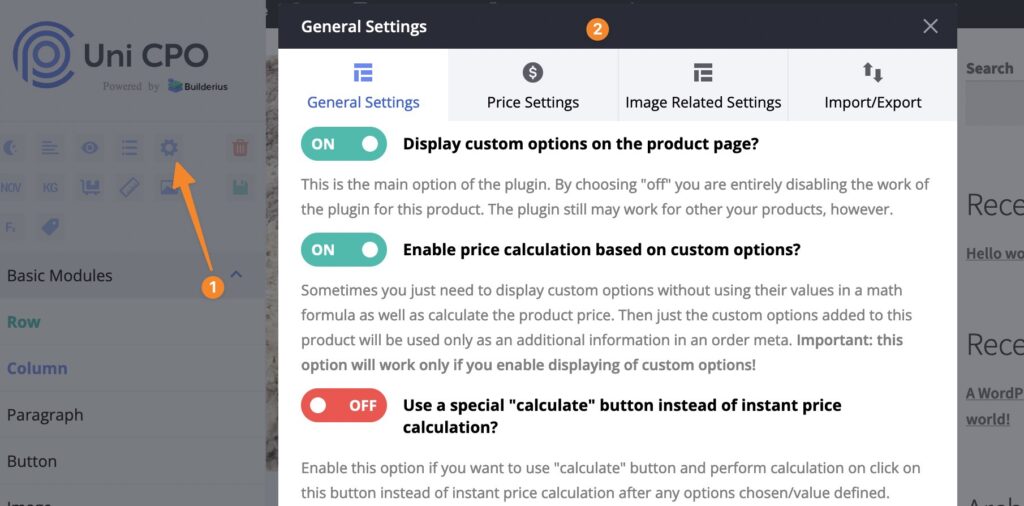
This is an important step! Custom options can be turned on and off any time without deleting actual options and their values. Quite often users forgot to enable displaying of custom options and price calculation though.
Extra step: we go to “Price Settings” tab and set “Starting price” setting. This way we will achieve displaying “from XX” in place of the product price on product archive pages.
When customer choose type “Predefined size” it must be possible to choose one of such sizes. Do you remember we have set prices for each size? Now we are going to use them as a product price. This is what we have to do:
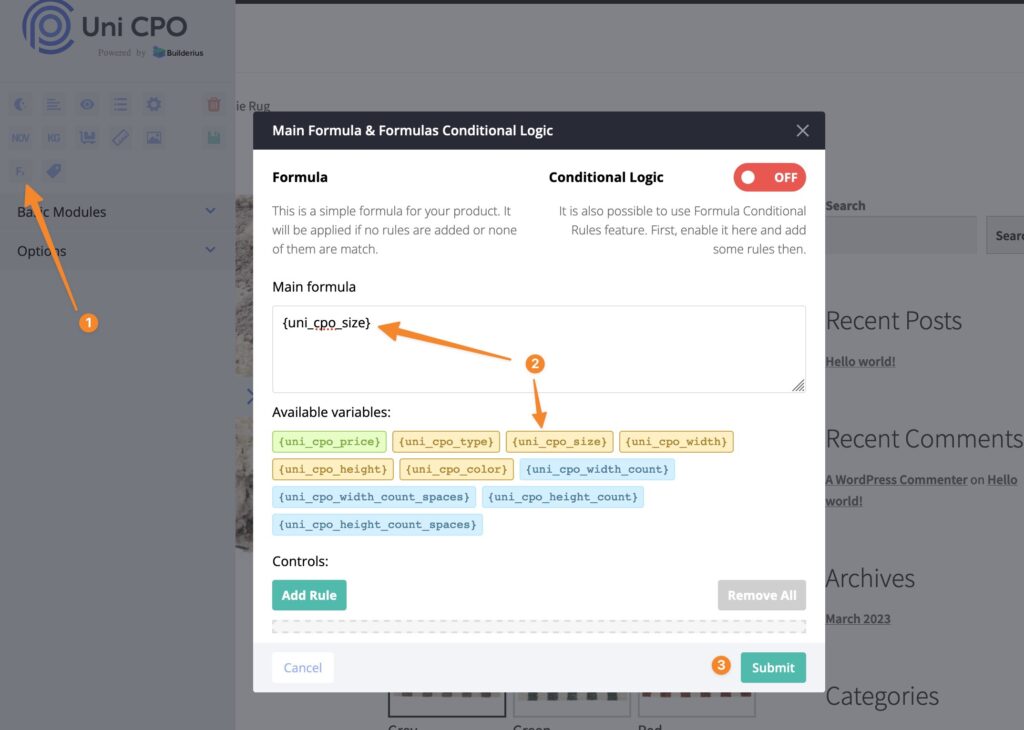
We have just set up our first pricing formula. It was fast and easy. The formula itself is just a variable that will be equal to the price set for the chosen suboption/choice. Done!
The idea behind pricing for custom dimensions is to charge customers per 1 sq. m. Let’s say, the base price for 1 sq. m. is 60€. Example: if customer chooses 130cm width and 200cm height, the price must be (130*200)/10000*60 = 156€. In this formula “(130*200)/10000” is the area in sq m.
We are going to add a non option variable (NOV) that will be calculating the area in sq m. It is easier to split the final formula into chunks or pieces so then it is easier to understand how it works.
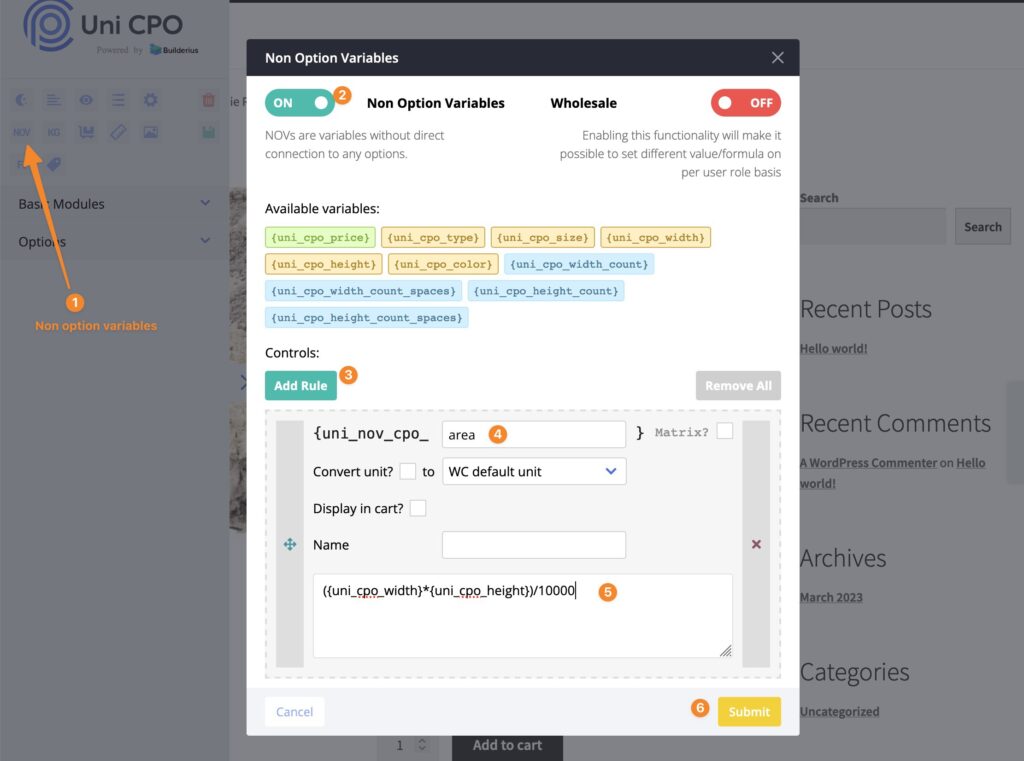
Non option variables are unique feature of Uni CPO and it is even more powerful tool! In this tutorial I am just tipping the iceberg of this functionality. You certainly should read more about it in our documentation.
Now we have a new variable that is equal to the area of the product based on customer defined “width” and “height”. We open main price calculation formula modal window again and adjust it:
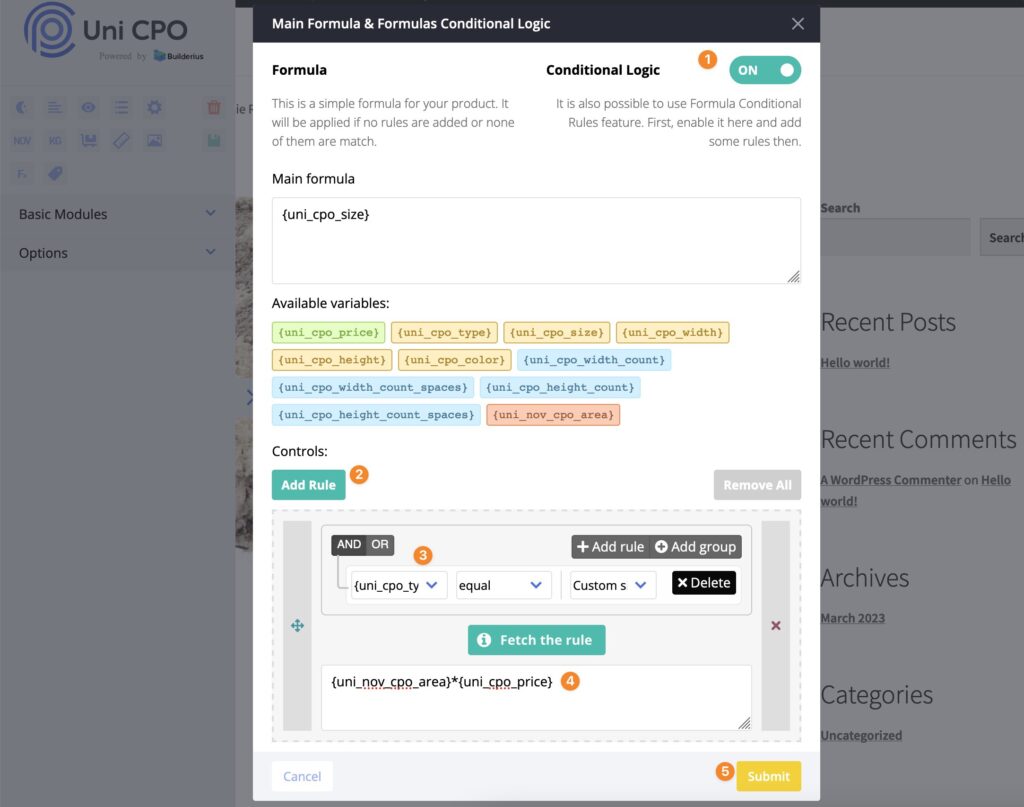
And we are done! The product we have at the end:
Building a product with measurement-based pricing in WooCommerce is certainly achievable with Uni CPO. We have learned to add custom options and configure pricing for our product. There are many more types of products – like windows, doors, shutters, printing cards and banners etc – which are using similar configuration. You could easily apply this tutorial even if you sell a different type of product. Should you have any questions, don’t hesitate to get in touch with us. We’re here to offer our assistance!